Dans ce tuto nous allons plonger dans les arcanes d’un cluster de containers.
MAIS POURQUOI UN CLUSTER ?
Tandis que le docker engine est fait pour lancer des applications dans des containers, il lui manque de sérieuses fonctionnalités pour aller en production. La principale est son exécution sur une seule machine, pas de mode distribué, le container est attaché à un seul nœud !
La seconde est sa fragilité puisqu’il ne peut pas compter sur une haute disponibilité de son infrastructure. En résumé, si on perd le nœud exécutant les containers, on perd tout !
LA SOLUTION ?
Avec les versions égales et postérieures du docker engine version 1.12, le gestionnaire de containers en mode cluster (appelé Orchestrateur) est directement embarqué avec le moteur, pas d’installation supplémentaire ????
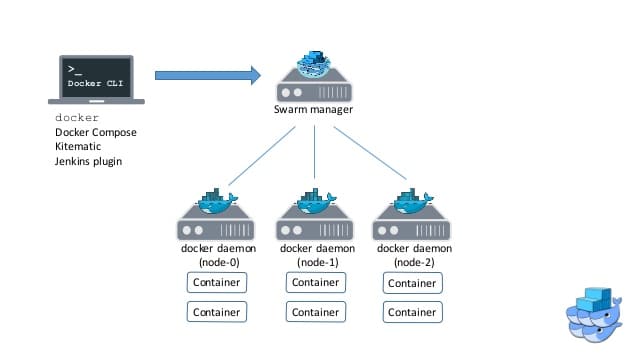
En utilisant le mode Swarm, un cluster de différentes machines (distributed nodes) vont fonctionner dans un schéma “master / worker” que vous connaissez dans d’autres technologies (MongoDB, Hadoop, ElasticSearch ..).
L’ARCHITECTURE ?
Le Docker Swarm est un cluster de machines hébergeant docker Engine, connecté par un réseau Overlay qui va gérer le service de découverte..
Un cluster peut avoir un ou plusieurs managers mais aussi un ou plusieurs workers (quoique un cluster de 1 nœud n’a pas vraiment de sens).
Attention, les nœuds workers ne peuvent pas visualiser ou modifier la configuration du cluster, seuls les managers peuvent le faire.
Lorsque les nœuds Docker ne fonctionnent pas dans un cluster Swarm, on dit qu’ils sont dans un “single-engine mode”.
Dès qu’ils sont intégrés dans un cluster ils fonctionnent en “swarm mode”.
Dans un cluster Swarm nous ne parlons pas vraiment de container mais plutôt de Service.
Les services prenant en charge les containers (appelés “replica” ou “task”) vont être déployés à travers les nœuds du cluster, pour cela Swarm utilise un load balancer embarqué pour gérer la répartition de charge.
Les états attendus des différents services (running, stopped …) vont être gérés par le manager qui va jouer un vrai role de chef d’orchestre (d’ou le nom… ).
Toutes les opérations de scaling, rolling upgrades ou rollbacks se feront sur les services et non pas les containers !
La configuration et l’état de Swarm sont maintenu dans une database distribuée (etcd) stockée sur chaque Manager.
Attention ce n’est pas le manager qui télécharge et lance les containers mais bien les workers qui respectent les ordres du manager (comme dans une team).
Je ne rentrerai pas dans les détails dans ce tutoriel la notion de Raft Consensus et du Quorum qui maintient la haute disponibilité du cluster mais si vous souhaitez plus d’info, c’est dans la documentation de docker. Pour ne retenir qu’un seul conseil au sujet de la HA, je vous conseille très fortement trois ou cinq managers dans votre cluster.
ET LA SÉCURITÉ ?
Ce qui est vraiment appréciable avec Docker Swarm c’est l’automatisation de la sécurité. En effet, “out-of-the-box” vous avez une appli. qui gère automatiquement le protocole TLS pour l’encryption des communication et la gestion des nœuds autorisés ainsi que la gestion des tokens.
Ports ?
L’ouverture des ports doit être effectuée sur :
tcp:2377 (pour les clients)
tcp:7946 et udp:7946 (gossip protocole)
udp:4789 (pour la partie network)
Nous allons monter notre environnement Swarm pour expérimenter ce type de cluster.
Pour cela utilisons docker-machine qui se prête très bien à ça
#En bash vous pouvez le faire en une seule commande:
#for machine in master node1 node2; do docker-machine create -d virtualbox --virtualbox-memory "512" ${machine}; done
C:\Users\eduquesnoy.DESKTOP-1QNJFRR> docker-machine create -d virtualbox --virtualbox-memory "512" master
Running pre-create checks...
(master) Default Boot2Docker ISO is out-of-date, downloading the latest release...
(master) Latest release for github.com/boot2docker/boot2docker is v18.02.0-ce
(master) Downloading C:\Users\eduquesnoy.DESKTOP-1QNJFRR\.docker\machine\cache\boot2docker.iso from https://github.com/boot2docker/boot2docker/releases/download/v18.02.0-ce/boot2docker.iso...
(master) 0%....10%....20%....30%....40%....50%....60%....70%....80%....90%....100%
Creating machine...
(master) Copying C:\Users\eduquesnoy.DESKTOP-1QNJFRR\.docker\machine\cache\boot2docker.iso to C:\Users\eduquesnoy.DESKTOP-1QNJFRR\.docker\machine\machines\master\boot2docker.iso...
(master) Creating VirtualBox VM...
(master) Creating SSH key...
(master) Starting the VM...
(master) Check network to re-create if needed...
(master) Windows might ask for the permission to configure a dhcp server. Sometimes, such confirmation window is minimized in the taskbar.
(master) Waiting for an IP...
Waiting for machine to be running, this may take a few minutes...
Detecting operating system of created instance...
Waiting for SSH to be available...
Detecting the provisioner...
Provisioning with boot2docker...
Copying certs to the local machine directory...
Copying certs to the remote machine...
Setting Docker configuration on the remote daemon...
Checking connection to Docker...
Docker is up and running!
To see how to connect your Docker Client to the Docker Engine running on this virtual machine, run: C:\Program Files\Docker\Docker\Resources\bin\docker-machine.exe env master
PS C:\Users\eduquesnoy.DESKTOP-1QNJFRR> docker-machine create -d virtualbox --virtualbox-memory "512" node1
...
PS C:\Users\eduquesnoy.DESKTOP-1QNJFRR> docker-machine create -d virtualbox --virtualbox-memory "512" node2
...
#Voila l'infrastrure est en place !
Remarque : Vous avez vu que la commande pour rejoindre un cluster en tant que manager ou worker est quasi-identique ? C’est le Token qui différencie le role du nouveau nœud dans le cluster !
#Configurons le master et les workers maintenant
PS C:\Users\eduquesnoy.DESKTOP-1QNJFRR>  docker-machine ip master
192.168.99.100
PS C:\Users\eduquesnoy.DESKTOP-1QNJFRR>  docker-machine ssh master
                        ##         .
                  ## ## ##        ==
               ## ## ## ## ##    ===
           /"""""""""""""""""\___/ ===
      ~~~ {~~ ~~~~ ~~~ ~~~~ ~~~ ~ /  ===- ~~~
           \______ o           __/
             \    \         __/
              \____\_______/
 _                 _   ____     _            _
| |__   ___   ___ | |_|___ \ __| | ___   ___| | _____ _ __
| '_ \ / _ \ / _ \| __| __) / _` |/ _ \ / __| |/ / _ \ '__|
| |_) | (_) | (_) | |_ / __/ (_| | (_) | (__|   <  __/ |
|_.__/ \___/ \___/ \__|_____\__,_|\___/ \___|_|\_\___|_|
Boot2Docker version 18.02.0-ce, build HEAD : 99245f4 - Thu Feb  8 17:43:39 UTC 2018
Docker version 18.02.0-ce, build fc4de44
docker@master:~$ docker swarm init --advertise-addr 192.168.99.100
Swarm initialized: current node (omv2dqtaj2t13brays02j8ock) is now a manager.
To add a worker to this swarm, run the following command:
    docker swarm join --token SWMTKN-1-27ntq8roo5zoxfpqrjddvl85byjuln9tm2xj5w7fz3ymodi645-3limxq362vpmv7w7mnq5b511s 192.168.99.100:2377
To add a manager to this swarm, run 'docker swarm join-token manager' and follow the instructions.
docker@master:~$ exit
PS C:\Users\eduquesnoy.DESKTOP-1QNJFRR>  docker-machine ssh node1
                        ##         .
                  ## ## ##        ==
               ## ## ## ## ##    ===
           /"""""""""""""""""\___/ ===
      ~~~ {~~ ~~~~ ~~~ ~~~~ ~~~ ~ /  ===- ~~~
           \______ o           __/
             \    \         __/
              \____\_______/
 _                 _   ____     _            _
| |__   ___   ___ | |_|___ \ __| | ___   ___| | _____ _ __
| '_ \ / _ \ / _ \| __| __) / _` |/ _ \ / __| |/ / _ \ '__|
| |_) | (_) | (_) | |_ / __/ (_| | (_) | (__|   <  __/ |
|_.__/ \___/ \___/ \__|_____\__,_|\___/ \___|_|\_\___|_|
Boot2Docker version 18.02.0-ce, build HEAD : 99245f4 - Thu Feb  8 17:43:39 UTC 2018
Docker version 18.02.0-ce, build fc4de44
docker@node1:~$ docker swarm join --token SWMTKN-1-27ntq8roo5zoxfpqrjddvl85byjuln9tm2xj5w7fz3ymodi645-3limxq362vpmv7w7mn
q5b511s 192.168.99.100:2377
This node joined a swarm as a worker.
docker@node1:~$ exit
PS C:\Users\eduquesnoy.DESKTOP-1QNJFRR>  docker-machine ssh node2
                        ##         .
                  ## ## ##        ==
               ## ## ## ## ##    ===
           /"""""""""""""""""\___/ ===
      ~~~ {~~ ~~~~ ~~~ ~~~~ ~~~ ~ /  ===- ~~~
           \______ o           __/
             \    \         __/
              \____\_______/
 _                 _   ____     _            _
| |__   ___   ___ | |_|___ \ __| | ___   ___| | _____ _ __
| '_ \ / _ \ / _ \| __| __) / _` |/ _ \ / __| |/ / _ \ '__|
| |_) | (_) | (_) | |_ / __/ (_| | (_) | (__|   <  __/ |
|_.__/ \___/ \___/ \__|_____\__,_|\___/ \___|_|\_\___|_|
Boot2Docker version 18.02.0-ce, build HEAD : 99245f4 - Thu Feb  8 17:43:39 UTC 2018
Docker version 18.02.0-ce, build fc4de44
docker@node2:~$ docker swarm join --token SWMTKN-1-27ntq8roo5zoxfpqrjddvl85byjuln9tm2xj5w7fz3ymodi645-3limxq362vpmv7w7mnq5b511s 192.168.99.100:2377
This node joined a swarm as a worker.
docker@node2:~$ exit
PS C:\Users\eduquesnoy.DESKTOP-1QNJFRR>  docker-machine ssh master
                        ##         .
                  ## ## ##        ==
               ## ## ## ## ##    ===
           /"""""""""""""""""\___/ ===
      ~~~ {~~ ~~~~ ~~~ ~~~~ ~~~ ~ /  ===- ~~~
           \______ o           __/
             \    \         __/
              \____\_______/
 _                 _   ____     _            _
| |__   ___   ___ | |_|___ \ __| | ___   ___| | _____ _ __
| '_ \ / _ \ / _ \| __| __) / _` |/ _ \ / __| |/ / _ \ '__|
| |_) | (_) | (_) | |_ / __/ (_| | (_) | (__|   <  __/ |
|_.__/ \___/ \___/ \__|_____\__,_|\___/ \___|_|\_\___|_|
Boot2Docker version 18.02.0-ce, build HEAD : 99245f4 - Thu Feb  8 17:43:39 UTC 2018
Docker version 18.02.0-ce, build fc4de44
docker@master:~$ docker node ls
ID                            HOSTNAME            STATUS              AVAILABILITY        MANAGER STATUS
omv2dqtaj2t13brays02j8ock *   master              Ready               Active              Leader
jvqa0f8tha6t79cbtmw2wsygl     node1               Ready               Active
yybipmppfyixuh497voo5e3qv     node2               Ready               Active
docker@master:~$
Comme nous pouvons le voir dans la dernière commande nous avons un leader (manager) sur notre instance master et 2 workers sur les nodes 1 et 2.
Nous pouvons commencer à travailler avec les services maintenant !
les options “–advertise-addr” et “–listen-addr” sont optionnelles mais recommandées. Elles contiennent l’IP du nouveau nœud dans le cluster.
# les 3 commandes fondamentales pour gérer un cluster Swarm :
$ docker swarm # Permet la gestion du cluster
$ docker service # Permet la gestion des conteneurs
$ docker node # Permet la gestion des Nodes
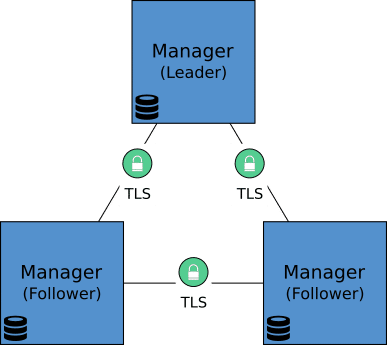
L’ARCHITECTURE DU CLUSTER
Lorsque le cluster possède plusieurs managers , un seul (le leader) gère la configuration du cluster et les autres (followers, status reachable) sont disponibles pour remplacer le leader en cas de défaillance.
ALLER PLUS LOIN DANS LA SÉCURITÉ DU CLUSTER
Il faut savoir qu’une restauration d’un vieux nœud manager (avec les certificats valides) peut mettre en péril la sécurité de votre serveur.
Le nouveau nœud aura accès à la database utilisé par le protocole Raft et aura donc accès à tout votre cluster.
Pour votre prémunir d’une telle situation, Docker vous permet de “locker” votre cluster pendant son fonctionnement.
# sécuriser un swarm cluster au moment de son "initialisation" => option --autolock
# si le cluster est déjà "running", un update est obligatoire :
docker swarm update --autolock=true
Swarm updated.
To unlock a swarm manager after it restarts, run the `docker swarm unlock`
command and provide the following key:
    SWMKEY-1- MrE8NgAyKj5r3NcR4FiQMdgu 7W72urH0EZeSmP/0Y
Please remember to store this key in a password manager, since without it you
will not be able to restart the manager.
#relancer un noeud manager pour tester la sécurité maintenant:
service docker restart
# puis tenter une commande Swarm
$ sudo service docker restart
$ docker service ls
Error response from daemon: Swarm is encrypted and needs to be unlocked before it can be used. Use "docker swarm unlock" to unlock it.
# solution pour débloquer:
$ docker swarm unlock
Please enter unlock key  => fournir la précédente clé générée
# maintenant vous allez pouvoir effectuer toutes les commandes dans le cluster.
COMMENT CRÉER UN SERVICE ?
La syntaxe est assez proche du docker run mais avec quelques options en plus …
# Commençons par la création d'un service nginx avec une seule réplica
docker service create --replicas 1 --name web -p 80:8080 nginx:mainline
  web.1  nginx:mainline  node1  Running        Running 12 seconds ago
#Puis multiplions les replicas par 5
docker service scale web=5
web scaled to 5
#Vérifions la configuration du service web
docker@master:~$ docker service ls  => liste tous les services du cluster
ID            NAME  REPLICAS  IMAGE                 COMMAND
cwrfie1hxn8g  web   5/5       nginx:mainline
# l’état désiré du service web est bien égal à son état actuel.
# et finalement son implémentation sur nos 3 nœuds (1 master et 2 workers)
docker@master:~$ docker service ps web => détaille le service web au niveau de son implementation
ID                         NAME   IMAGE                 NODE    DESIRED STATE  CURRENT STATE           ERROR
7b2osbdqc3sg84mixgzxip1fk  web.1  nginx:mainline  node1   Running        Running 5 minutes ago
cwpw2g0mw5gqnds0mvdem5gyx  web.2  nginx:mainline  master  Running        Running 26 seconds ago
2y4mhbc6liaohkls5io76vwbu  web.3  nginx:mainline  node2   Running        Running 26 seconds ago
f01kh9kn8pprj528mnl3xnzj1  web.4  nginx:mainline  node2   Running        Running 26 seconds ago
avn8ukb1jt9zd7ct462h07e0l  web.5  nginx:mainline  node1   Running        Running 26 seconds ago
#Nous pouvons voir que Swarm essaye de répartir "au mieux" les 5 replicas du service web.
#pour aller plus loin dans la configuration du service web nous pouvons faire une "inspection":
docker service inspect --pretty web  (je conseille l'option pretty pour la visibilité du output)
ID:         cwrfie1hxn8g
Name: Service web
...
Tous les services sont constamment monitorés par Swarm, il compare en permanence l’état désiré avec l’état actuel.
Si il y a un écart, Swarm entreprend les actions correctrices dans les plus brefs délais.
DIFFÉRENCE ENTRE LES SERVICES GLOBAUX ET LES SERVICES RÉPLIQUÉS
La différence est très simple à comprendre :
Lors de l’utilisation des services distribués vous spécifiez exactement le nombre de réplicas que vous souhaitez.
Swarm essaye de gérer au mieux votre demande (nous verrons les contraintes plus tard) sur tous les nœuds disponibles.
Quant aux services globaux, c’est bien plus simple : un seul réplica sur chaque nœud , point final !
# Pour configurer un service comme global il faut ajouter l'option --mode global, exemple :
$ docker service create \
  --mode global \
  --publish mode=host,target=80,published=8080 \
  --name=nginx \
  nginx:latest
COMMENT SUPPRIMER UN SERVICE ?
#super simple de supprimer un service du cluster :
docker@master:~$ docker service rm web
web
docker@master:~$ docker service ps web
ID                         NAME   IMAGE                 NODE    DESIRED STATE  CURRENT STATE           ERROR
LA MISE À JOUR DES SERVICES OU LE FAMEUX ROLLING UPDATE
Imaginons que nous avons développé un microservice en version 1 et que nous avons lancé 12 replicas sur 6 nœuds (mgr1→3 , wrk1→ 3).
Après un moment en production, nous souhaitons mettre à jour ce microservice en version 2 sans interruption de service.
Pour cela nous allons utiliser la fonctionnalité Rolling Update de Docker Swarm :
# creation du service initial ms-svc en version 1
# le port 80 est exposé sur tous les noeuds et un réseau smart_ms est dédié au service.
# le service sur le port 80 sera joinable de partout car le service tourne en mode ingress
# Même les noeuds sans replicas pourront "rerouter" les demandes au service ms-svc sur les bons noeuds.
# le nom du service est ms-svc basé sur la version 1 de l'image microservice
docker service create \
  --name ms-svc \
  --replicas 12
  --publish 80:80 \
  --network smart_ms
  smartwave/microservice:v1
$ docker service ls
ID NAME REPLICAS IMAGE
dhbtgvqrg2q4 ms-svc 12/12 smartwave/microservices:v1
# comme vous pouvez le voir le nombre de réplicas est 12 !
# Détaillons la répartition aec la commande docker service ps:
$ docker service ps ms-svc
ID NAME IMAGE NODE DESIRED CURRENT STATE
0v...7e5 ms-svc.1 smartwave/...:v1 wrk3 Running Running 1 min
bh...wa0 ms-svc.2 smartwave/...:v1 wrk2 Running Running 1 min
23...u97 ms-svc.3 smartwave/...:v1 wrk2 Running Running 1 min
82...5y1 ms-svc.4 smartwave/...:v1 mgr2 Running Running 1 min
c3...gny ms-svc.5 smartwave/...:v1 wrk3 Running Running 1 min
e6...3u0 ms-svc.6 smartwave/...:v1 wrk1 Running Running 1 min
78...r7z ms-svc.7 smartwave/...:v1 wrk1 Running Running 1 min
2m...kdz ms-svc.8 smartwave/...:v1 mgr3 Running Running 1 min
b9...k7w ms-svc.9 smartwave/...:v1 mgr3 Running Running 1 min
ag...v16 ms-svc.10 smartwave/...:v1 mgr2 Running Running 1 min
e6...dfk ms-svc.11 smartwave/...:v1 mgr1 Running Running 1 min
e2...k1j ms-svc.12 smartwave/...:v1 mgr1 Running Running 1 min
# Effectivement les containers sont répartis sur tous les noeuds possibles !
# Nous allons maintenant "updater" notre service avec l'image microservice version 2

 docker service update \
--image smartwave/microservices:v2 \
--update-parallelism 2 \
--update-delay 20s ms-svc
# Comme vous pouvez le voir, l'update des replicas doit se faire 2 par 2 et avec 20s d'interval entre les updates
# Regardons l'operation "en live" grace à la même commadne docker service ps
$ docker service ps ms-svc
ID NAME IMAGE NODE DESIRED CURRENT STATE
7z...nys ms-svc.1 smartw...v2 mgr2 Running 14 secs
0v...7e5 \_ms-svc.1 smartw...v1 wrk3 Shutdown 14 secs
bh...wa0 ms-svc.2 smartw...v1 wrk2 Running 1 min
e3...gr2 ms-svc.3 smartw...v2 wrk2 Running 13 secs
23...u97 \_ms-svc.3 smartw...v1 wrk2 Shutdown 13 secs
82...5y1 ms-svc.4 smartw...v1 mgr2 Running 1 min
c3...gny ms-svc.5 smartw...v1 wrk3 Running 1 min
e6...3u0 ms-svc.6 smartw...v1 wrk1 Running 1 min
78...r7z ms-svc.7 smartw...v1 wrk1 Running 1 min
2m...kdz ms-svc.8 smartw...v1 mgr3 Running 1 min
b9...k7w ms-svc.9 smartw...v1 mgr3 Running 1 min
ag...v16 ms-svc.10 smartw...v1 mgr2 Running 1 min
e6...dfk ms-svc.11 smartw...v1 mgr1 Running 1 min
e2...k1j ms-svc.12 smartw...v1 mgr1 Running 1 min
# Effectivement 2 réplicas en v2 viennent d'être lancés sur le mgr2 et wkr2,
# tandis que que 2 autres en v1 sur les mêmes noeuds viennent de s'arreter (status "shutdown").
# la migration de v1 vers v2 se déroule correctement !
COMMENT GÉRER LES LOGS ?
Les événements du service Swarm pourront être visualisés avec la commande “docker service logs”.
Par défaut, le log driver “json-file” sera utilisé, mais il existe d’autres drivers compatibles avec Swarm :
gelf
splunk
graylog
syslog
jounald
…
Pour modifier le log-driver, il suffit de le spécifier dans le fichier daemon.json situé sur le docker host.
Ou pour les cas particuliers le forcer avec les options –log-driver et –log-opts dans la commande “docker service create”.
Vous avez plusieurs options pour “docker services logs” : –follow (pour le suivi du log) , –tail ou –details (facile à comprendre).
$ docker service create -d --name ping --replicas=3 alpine:latest ping 8.8.8.8
5x3enwyyr1re3hg1u2nogs40z
# Nous avons créer un service de 3 replicas qui "ping" sur l'adresse 8.8.8.8
# vérifions les logs de ses 3 replicas avec une seule commande !
$ docker service logs ping
ping.2.n0bg40kksu8e@m00    | 64 bytes from 8.8.8.8: seq=43 ttl=43 time=24.791 ms
ping.3.pofxdol20p51@w01    | 64 bytes from 8.8.8.8: seq=44 ttl=43 time=34.161 ms
ping.1.o07dvxfx2ou2@w00    | 64 bytes from 8.8.8.8: seq=44 ttl=43 time=30.111 ms
ping.2.n0bg40kksu8e@m00    | 64 bytes from 8.8.8.8: seq=44 ttl=43 time=25.276 ms
ping.3.pofxdol20p51@w01    | 64 bytes from 8.8.8.8: seq=45 ttl=43 time=24.239 ms
ping.1.o07dvxfx2ou2@w00    | 64 bytes from 8.8.8.8: seq=45 ttl=43 time=26.403 ms
# Great ! facile à monitorer 🙂
LA SÉCURITÉ DANS UN CLUSTER SWARM
La rotation des certificats entre les différents nœuds est automatique dans Swarm et s’effectue tous les 90 jours.
Les certificats maintiennent l’encryption des communications entre les nœuds et donc leur confidentialité.
Le manager ou le leader dans le cas ou nous avons plusieurs managers sera considéré comme “le root CA”.
Si vous suspectez que les certificats de un ou plusieurs de vos noeuds ont été compromis vous pouvez les révoquer très simplement.
Et ainsi en produire de nouveau pour sécuriser l’ensemble des noeuds.
Voici la procédure :
# Effectuons le changement de certificats pour les managers:
PS C:\Users\eduquesnoy.DESKTOP-1QNJFRR> docker swarm join-token --rotate manager
Successfully rotated manager join token.
To add a manager to this swarm, run the following command:
    docker swarm join --token SWMTKN-1-27ntq8roo5zoxfpqrjddvl85byjuln9tm2xj5w7fz3ymodi645-0wvx82se9fc72q2vhesuyvke3 192.168.99.100:2377
# Effectuons maintenant le changement de certificats pour les workers:
PS C:\Users\eduquesnoy.DESKTOP-1QNJFRR> docker swarm join-token --rotate worker
Successfully rotated worker join token.
To add a worker to this swarm, run the following command:
    docker swarm join --token SWMTKN-1-27ntq8roo5zoxfpqrjddvl85byjuln9tm2xj5w7fz3ymodi645-496wk05wdqcio1szrtd1dhi1a 192.168.99.100:2377
Si vous pensez que 90 jours est une période bien trop longue, vous pouvez modifier la date d’expiration avec une commande docker Swarm :
$ docker swarm update --cert-expiry 720h ====> 1 mois